Monday, October 21, 2019

How to Hunt Deer if you never have Hunted Before

Are you wanting to hunt deer, but have never hunted before? By the end of this article, you will be armed with the knowledge to hunt deer. 


Why is being able to hunt deer important? If you can hunt deer effectively you can provide food for months and help the environment by helping to stop the spreading of Lyme disease, which is carried by deer and stop limiting the tree and plant growth of an ecosystem.

1. Choosing a weapon


The first step in hunting a deer for the first time would be choosing a weapon. The most popular types of weapons would be rifles, compound bows, or crossbows. The type of weapon most beginners start with is rifle to learn the ropes of hunting a deer. 

Assuming you choose to buy a rifle, you now need to consider these factors


  • Budget 
  • Fits the size of the shooter
  • High enough caliber to kill a deer quickly and effectively
  • Consistent with shots

Most popular deer hunting rifle calibers


  • 7mm Remington Magnum
  • .30-06 Springfield
  • .30-30 Winchester
  • .308 Winchester

2. Practice firing your weapon


The second step in hunting a deer for the first time would be practicing shooting your weapon. The saying "practice makes perfect" describes this process, by saying if you practice you will improve. The best way to practice is to have a target.


Steps to practice with a target


  1. Place a stationary target at least 25 yards away from the rifle
  2. If needed, use a rifle rest, a stand to keep the rifle steady, to stay on target until not necessary
  3. Shoot at the target and try to get "groups" on the target or bullets that were all close to each other
  4. As you become more comfortable move the target further out until around 100 yards
  5. Keep practicing from 100 yards or beyond, train for the distance you will most likely see

3. Hunter's safety course


The third and most important step in hunting a deer for the first time would be to take the Hunter's Safety Certification Course so you can buy a hunting license. You should take this safety course after you feel comfortable hitting the target. Each state in the United States sets its own laws for how to get certified and when you can. The most popular way is online through a combination of readings, pictures, and videos. They also do offer in-person safety courses at public places. These courses teach you virtually everything you would need to know to have a successful hunt, start to finish.


What do I have to do after passing the hunter's safety course?


After you receive your certification upon completing the safety course, you will want to purchase a permit or license to hunt. In most states, you may purchase a permit online or in person at a Department of Natural Resources near you.

What type of permit should I buy?


In the case of the state of Georgia, you may buy a big game license that just covers deer and other large animals. You also can buy a sportsman license which includes most animals and fishing privileges including deer and migratory birds.  


Keep in mind


At the beginning of the hunting season, you always want to check up on your state's and the county's latest regulations since they change almost every year. These regulations are things like how many deer you can kill, what kind of deer you can kill, and how many points they have to be on the antlers.

4. Equipment you want to have while hunting


The fourth step in hunting a deer for the first time would be having the right equipment with you on your hunt. This step is crucial because it keeps you safe and helps to have a more successful and less stressful hunt.

Recommended equipment


  • Your choice of weapon
  • Your permits or licenses
  • Bright orange vest for safety
  • Correct ammunition for your firearm
  • Warm clothes for cold hunts like deer
  • Your phone or other communication devices
  • Knife for many different uses
  • Flashlight or lighting device for night hunts
  • Gloves for protection against disease and cold
  • Food and water
  • Boots for the rugged terrain and elements
  • Backpack to carry supplies

Do I really need all the recommended equipment?


Yes, in most cases all of these supplies and equipment are needed for a safe and successful hunt. You do not realize the sheer importance of each item until you forget one during a hunt.

5. Finding an area to hunt


The fifth step in hunting a deer for the first time would be to find a suitable hunting area. Some people will use their own land to hunt on if it is a habitat for deer, while some have to resort to a public hunting area or hunt on acquaintances' land.

What kind of area is the best to set up while hunting?


In most instances, a wooded area with a large opening will find the most success or on the edge of open farming land. This allows you, the hunter to be covered, but the deer be in the open for an easier shot.

Do I need to use a tree stand?


Using a tree stand is a matter of preference, but most people like you, on their first couple hunts will want to hunt on the ground to become familiar with the process. The tree stand does have advantages like being elevated off the ground which conceals you more from the deer because you are not at ground level. The disadvantages are the cost of a stand and the mobility you will lose.

A proven way to increase the chances of a successful hunt


One way to increase your chances of seeing a big deer is to attract. This can be done with food like deer corn, scents, and posts so they scrape their antlers against it. These practices are regulated state by state, especially the deer corn. In most areas deer corn can only be out no later than 10 days prior to a season or earlier. Doing this will dramatically increase your chances of seeing a worthy big deer.

6. What to do when you see a big deer 


The sixth step in hunting a deer for the first time would be analyzing the deer you see, to make sure it legal and worthy of killing. You only want to kill a deer you would eat and pass the regulation of state or county. 

After confirming the deer is worthy


After you confirm the deer is worthy of shooting, you want to make sure you stay calm and composed. A way to stay calm and composed is taking deep breaths before a shot. Before taking the gun off safety you want to make sure the deer is in the open and check the background so if you miss the shot it will not harm anything. You want to make the deer is broadside, so the deer is at the best angle to shoot, this is behind the front shoulder in the vitals. 

7. If your shot is successful on the deer


Whether your deer ran after being shot or barely moved, you want to wait at least 5 minutes so the deer to calm down enough. If your deer did run, make sure to look to see the direction of where it went. 

How to follow a trail of a deer that ran


The first thing you have to do is go over to around where you shot the deer. Then, examine the area for hints of the direction of where the deer ran. These hints are anything from fur, to tracks, and the most important and obvious blood. Once a trail is found it is straightforward, follow it to the deer. After stumbling upon the deer, you now see if the deer is dead or alive, if alive you are going to have to shoot it again or more humanely cut the area around the neck.

8. What to do after killing the deer


The final step in this first time killing a deer journey is to tag and report the deer to the Department of Natural Resources. This also where you decide to butcher the Deer yourself or get a processing shop to do it for you for a small price. You will have abundant venison for months and it is delicious.

Ways to tag or report a deer


This like everything else depends on the state regulations. Some states you have to write down, then tell a game warden and some report it on your phone or both. This tag and reporting system helps the Department of Natural Resources decide on new regulations to conserve the deer population.

Do I need a pickup truck to transport a deer?


No, not necessarily while a pickup truck with the bed is the easiest way to transport your deer, you can transport it with almost any type of vehicle. For larger cars and SUVs you can use the back trunk with some tarp, or most opt for a small towing trailer to put the deer on.

So why does deer hunting matter?


Deer hunting matters as it controls the rising deer population. You may ask why a rising deer population is a bad situation, but deer can overcrowd a forest's vegetation and carry diseases like Lyme disease. It also provides you with plenty of delicious meat to eat for months, as most deer weight 150-200 pounds. So, you now know how to effectively and ethically hunt a deer. This activity needs to continue as it keeps nature in a balance because moderation is the key.


Sources


https://georgiawildlife.com

https://georgia.gov/popular-topic/hunting-licenses

https://www.mayoclinic.org/diseases-conditions/lyme-disease

http://www.deerfriendly.com/decline-of-deer-populations

https://www.realtree.com/deer-hunting/how-to-deer-hunt


How to Survive Babysitting

How to Survive Babysitting

Have you just received your first babysitting assignment and have no clue on what to do? Read this article to help you be the perfect babysitter that everyone loves. These tips will not only help you prevent chaos, but they will also have parents and children begging for you to come back next time. In the end, the more they love you the more money you make. Babysitting is a tough job, but one that can be enjoyable. Being prepared is key to success with babysitting. Taking care of kids is hard, especially when you do it the right way. Knowing the elements listed below will help make your babysitting experience successful.

Always Be Prepared

There are always situations that occur that are not planned for. When babysitting, you want to know every little bit of information that could help solve a problem. You will need to be prepared for any type of situation that may arise.

Crisis Situations

The main job as a babysitter is to keep the children in your care safe. When dealing with children of all ages you need to be calm in any situation, especially in an emergency situation. When you stay calm and keep the child calm, it helps to prevent chaos and panic. Here is a list of phone numbers to have on hand in case of a crisis.

Parents (phone number and email)
Emergency Contact
Poison Control
Family
Close neighbors
Child’s Doctor


Allergies

Many kids have allergies and it is important to know what those are to prevent an unwanted
allergic reaction. When babysitting, it is very seldom that the kid will not be allergic
to anything.

Provide Healthy Meals and Snacks

During the time you are babysitting, you might be asked to prepare a meal or a
snack for kids.  It is critical to ask about meals and snacks that need to be
provided.  As a babysitter, you need to know about foods that pose potential
choking hazards depending on the age of the child.  For example, for a child
under six, it would be important to cut grapes in half to prevent choking.
Getting kids to eat healthy meals and snacks can often be a challenge. One way
to solve this issue is to provide snacks that are fun and kid-friendly. One
example of a kid-friendly, nutritious snack is an Apple Smile. With only a few
ingredients, you can make this simple, no-bake snack with the kids.

Making Apple Smiles

Ingredients:
Apples
Creamy peanut butter
Mini marshmallows


To Make:

  1. Slice the apple into ½ inch wedges.
  2. Spread creamy peanut butter on one side of the apple.
  3. Press another slice of apple on top.
  4. Cut the mini marshmallows in half.
  5. Press mini marshmallows into the peanut butter for “teeth”.
  6. Enjoy!


Knowing the Rules and Boundaries

No one wants to be known as the babysitter that was so strict their kids could do
nothing. You never want to make them feel like they are always doing the wrong
thing but, sometimes you have to let them know who is in charge. Always check
with the parent for some rules that they follow on a day to day basis.
Every now and then you can bend the rules but that can only happen to a certain extent.  Kids function best with structure and consistency.  Following the
normal rules and routines will help your babysitting job run smoothly and you
will also have the respect of the kids and the parents.


Be Active and Entertaining

It might seem simple to entertain kids with television or other technology.
However, a fabulous babysitter engages kids with a wide variety of activities.
Before the day of babysitting, ask the parents about activities that are
acceptable to do with the kids. Find out about activities, such as a playground
or park, that is within walking distance. Find out what types of toys and games
that the kids would be interested in. Some examples of fun activities to do with
kids are listed below.

Fun Activities

Obstacle course (set up with safe items such as pool              noodles and floats)
Make paper airplanes
Arts and crafts
Read a book
Build a fort out of boxes

Have Fun - And Enjoy the Kids!

Babysitting can be a rewarding job.  It is crucial to be prepared, know the rules
and boundaries, provide healthy meals, and be active and entertaining.  Your number one priority of babysitting is keeping the kids in your care safe. However,
you want to be a babysitter that the kids enjoy and want to spend time with again
and again. I have found that my most successful babysitting experiences happened when I came prepared and enjoyed spending time with the kids. If you follow the steps listed above, you will have a great time with the kids and the parents will
be ready for you to come back soon.

Bass fishing for beginners

Bass fishing for beginners

Tips and tricks to help beginner bass anglers 

This blog is designed to help the amateur bass angler get started into the amazing world of bass fishing. Bass fishing is an exiting new hobby, but can be intimidating for someone who is new to it. There is a huge market for fishing and figuring out where to start can be hard. These tips in this article should help to get you started and may even help you catch a bass.

where to start...

There are many different ways, places, and times of year to fish. There are millions of different rods, reels, lures, and other combinations to pursue fish. These methods are what I have found that works the best for me and what I prefer and should bring you the same results as they have for me. 

Getting license if needed 

If you are fishing a public area you will need a fishing license. Fishing in a public area without a license is against the law. The money that comes into the state for fishing license goes to research and conservation practices. Not only are license a must to be legal they help keep the sport of fishing alive. In the state of Georgia for residents the price for a license is 15$ for a year. if you are fishing a privately owned lake or pond you will not need a license. 

Gear needed

-Fishing rod
-Fishing reel
-Fishing line
-Tackle and lures
-Tackle box
-Tackle bag
-Pair of needle nose pliers
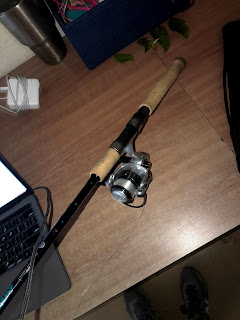
There are two different types of fishing reels that you can use. You can use either bait casting reels or spinning reels. You can purchase both for pretty cheap and both are effective. Some people just prefer one over the other.
Here is a Shimano bait caster reel
              
This is a spinning Abu Garcia spinning reel

Lures 

You can buy hard lures, soft plastics, or bladed baits. All work but some work better under certain conditions. When the water is warm (45 degrees or warmer) you can really use any lure and have success. you can find the water temperature by searching current water temperature in your area online. If the water temperature is lower than that you should use a more slower presentation lure. This means use a bait that you can present in more of a slow method. You want to do this because like humans fish act slower in cooler temperatures and don't like to eat as much. In reality thats what you are doing when fishing, you are trying to entice the fish into eating your bait to catch them.

What kind of lures should you use?

Here are some pictures of some different lures that are my go to baits and should also work for you:
This lure is called a chatter bait. You should fish this lure on a bait caster reel for the best results. this particular bait above is a War Eagle brand chatter bait in the chartreuse and white color pattern. you use it by casting it toward sticks, grass, and even open water. you then slowly retrieve it back in and repeat.

This lure pictured above is called a soft plastic worm. This is one of the simplest lures to fish with in my opinion and one of my most effective methods. The worm pictured above is called a Yum brand worm and the color of the worm is called Green Pumpkin. This worm should be used on a 3/16oz worm hook and should be fished on 6 to 8 pound line. I wouldn't recommend anything heavier than that. You fish this lure be casting it out and letting it sink to the bottom. You then should move your rod up and down making the worm drag across the bottom while slowly reeling  in the slack line.

Line

When bass fishing you should use line any where from 6 pound to 20 pound test line. The "test line" means the amount of stress the line can handle. 6 to 20 pound line is plenty for bass.

Other gear 

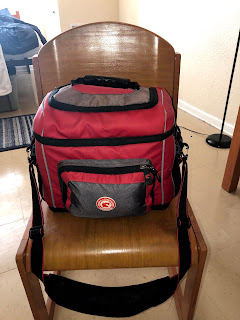
You will need a tackle box or two to keep your lures and other gear in. You should also purchase a tackle bag to keep all of your other stuff in. When you are organized it makes walking around and fishing a lot easier and less stressful.
this is a coastal conservative brand tackle bag


You should also purchase a pair of needle nose pliers. These can come in handy when you catch a fish to safely remove the hook form its mouth. Sometimes the hook can be too hard to get out with your hand. When this happens you need to use these pliers to get it out quickly. This helps to get the fish back in the water as quick as possible. Doing little things like this helps to practice good conservation and keeps the sport of bass fishing alive.


Other tips

Bass fishing has been one of my favorite hobbies to do ever since I was a young kid and was taught a these few tips. It is a very relaxing activity and can be very good for the mind. It is a great way to get outdoors and enjoy nature. It can be a great weekend or weekday activity. When you are organized and have legally purchased a license fishing can produce endless days of fun and can be done with friends and family. Fishing is a good time to also practice good conversation practices such as taking care and properly releasing fish quickly, cleaning up trash around lakes, ponds, and rivers, and also teaching other people the fun of the great outdoors. I hope these tips can help you start your bass fishing experience and help you catch some bass. good luck! 


Watercolor For Beginners

Have you ever wanted to add some color to some of your artwork but you don’t know how? Or are you wanting to learn how to start off on a new art medium? Maybe watercolor is a way you can go!


What is watercolor exactly?


Watercolor itself, as a medium, is a simple concept of painting with flowing yet tedious and intriguing simple techniques. Watercolor paints are different colored pigments that are mixed with arabic gum which has the same consistency as honey and/or corn syrup. In that case, will help make sure it won’t flake off when it is dry on the paper. Paint that comes in tubes are wet colors and in the dry pallets you have your dry colors. The real magic and beauty of watercolor comes into play when you add some water and a few brush strokes onto the paper.


Things You Will Need 


There are really only four main items you will need to paint with watercolors: watercolor paint, brushes, specific paper, and water of course. However, there are other basic necessities for this process, but these will be based on your own preference.

Watercolor Paint


Watercolor paint comes in different mediums and as many colors that are in the rainbow and then
some more. However, for the basics you have mainly two mediums and twelve main colors.


The different Types


Wet colors: comes in a metal tube, is wet to the touch, more maintenance, requires a palette

Dry colors: comes in as “cakes” (watercolor paint put under pressure and is shaped into circles or rectangles) and put in holders called pans, dry to the touch until water is added, easier for travel, and simpler maintenance

The dry colors would be more reasonable for a beginner though the wet colors are perfectly fine as well.

Basic colors


The twelve basic watercolors you will need to start off with are:


  • Warm and cool versions of the three primary colors
  • A violet red
  • A black
  • Two earth tones, one usually light and the other darker
  • A warm and cool green


Brushes


For getting started you would not need an entire 20 piece brush set (nothing is saying you can’t) however you will need the two main styles for watercolor brushes.

Round: can create broad and fine lines within the same brush,  holds a well amount of water and paint

Flat: wide strokes, fine straight lines


Paper


There can be several kinds of paper you need for watercolor.

Watercolor: thicker, tougher, holds and absorbs water and the color, color is more radiant

Mixed Media: holds and absorbs the water and color, not as vibrant however, smoother surface


Water


Only thing to be said about this is for the water to be plentiful and clear.


How To:


Watercoloring is not necessarily a step by step process, but there are certain things that you can do or you will need to do for it to run smoothly.

First: setting it up


First thing you will need to do is to make sure all of the items you will need are set up how you would prefer and are close to you and each other. Once you start painting you will most likely not want to get up until an okay stopping point. This is because watercolor dries fast once on paper and you can not go back over a new layer and it to be smooth and clean.

Second: activating the paint


For wet or dry watercolor, you need water for the paint to "activate". Here what you do is you need to select a brush and put it in the water, and for this you may want to use a round brush to start with, at least to get the paint wet. Then apply the brush with an abundance of water to the paint.

Third: decide, draw, erase


Here you can either think about your art piece and how you would want it drawn and laid out on the paper you are using, or you can look at the blank canvas and let the brush guide your hand. If you are the latter of the two, skip to the next step please. Watercolor is very transparent and in return will show any graphite that is under it. For this to not happen you will need to either very lightly draw it out and leave it or draw it out and then erase it. If you try to erase after you put the paint on it and it has dried you will end up erasing the paint.

Fourth: applying the paint


Watercolor is the type of paint where you need to let the water be the vehicle. You need to have water with your paint regardless of how light or dark you may want it. The less vibrant you need that color to be, the more water you add to the paint. The more bold or vibrant you need it, the less water you add.

Fifth: just go with it


Once you have taken into consideration on these steps and on the things you need, and you have thought out what you want your art piece to look like, you should be ready to let the paint flow onto the paper. Enjoy!

How to learn the Basics of Piano

Class Blog


How To Learn The Basics of Piano


Want to learn the basics of piano?

So you're a beginner wanting to play the piano, but don't know how to even start? No need to stress over it, that's why this was created. Lots of people want to play the black and whites, but give up after a short time out of frustration. The thing is, the piano requires a lot of patience to learn, but persevering through the difficulties to learn will be rewarded with a feeling of achievement, and it feels great. But before we learn to play, there are things to learn beforehand. So let's go, plus ultra!


Start

Once again, patience is needed when beginning, so try not to get frustrated. This is the start after all. Before we start actually playing the piano, there are other important things to do beforehand.

Posture

Image result for piano posture
-You want to be seated where its comfortable to your height, and also where your fingers can rest comfortably on the keys, and on the level of the keys.

- Also you want to your feet to be able to reach the pedals (though if you're a beginner, don't worry about the pedals just yet). You also want your knees and feet under the piano, while keeping your feet flat on the ground.

-Sit up straight and keep your head and back aligned, keeping your back straight. Slouching can actually affect your playing and limits movement, so don't slouch.

-Also, your shoulders should always be relaxed. Don't tense up and, keep calm and try not to get anxious by calming down and taking deep breathes before. Get in a good position before playing to reduce stress. 

Keys/Notes and Octaves

Middle C
This is the center note on a piano. To find this key, sit in the center of the piano. Now look at the black keys, and you will notice that they are in groups of two and three. In the center, Middle C will be the white key exactly on the left of the group of two black keys. This is the center, and after finding this key, you can find the others. Now Middle C is also called C4, but we will get back to that in awhile.

White Notes
After finding Middle C, we will look at the white keys after it. Now look at the key after it. This will be D. The key after this will be E, F, G, A, B, and restarts at C. And it just keeps repeating C, D, E, F, G, A, B, C.
Black Notes 
Next we will look at the black keys, which are the flats and sharp notes. They are two notes in one basically, The first black key after Middle C is the C#/Db, and the keys after this black key is D#/Eb, F#/Gb, G#/Ab, and A#/Bb. These are really not for beginners, but it is good to be familiar with the names of the keys early on so when they are needed, there won't be as much confusion.

Octaves
Related image
Now octaves are simple. Octave means a series of eight occupying an interval, or space. For example, look for Middle C on the piano. The Middle C through B are 4's, so D will be D4, E will be E4, and so on until you reach B, or B4. The C after B4 will be a C5, as every time you pass a C, you go up an octave. Now go back to Middle C, or C4, and go back one note. This note is a B, but it is an below C4, so this B is B3, as it is in the third octave. The B3 backwards to the C will all be 3's, until you make it to C3, and the C though b below C3 will all be 2's.

Playing the notes/keys
Now, after you are sure of everything above this, we can move on to how we play notes/keys on a keyboard. Now this is more or less the last thing for a beginner, as everything else is for the ones with just a little more experience. Now then, we start with the fingers.

Fingers
-Now when you play these notes, remember that you curve your fingers while doing so. Like if you were hold a small ball while playing. Do not to play with your fingers flat.


Image result for piano fingering chart

 -Going on, your fingers and thumbs are numbered while playing for more effective playing. Your thumbs are 1, pointer fingers are 2, middle fingers are 3, ring fingers are 4, and your little fingers are 5. No matter what you play, the your fingers will always be the same.

-When playing, do not lift your little finger like you're drinking a cup of tea with the Queen of England. Do your best to keep it down.

-Your thumb, 1, and little fingers, 5, will never play black keys. It is difficult to use them in playing on black keys.

Example of how to play
Here is an example of how to play. Lets start with the simplest scale, the C scale. It consist of C4, D4, E4, F4, G4, A4, B4, and C5 for your right hand, and C3, D3, E3,F3, G3, A3, B3, and C4 for left. As a beginner, for now we will do it with just the right hand.

-Right Hand
Your 1 (thumb) on your right hand will be on Middle C. It is followed by your 2, 3, and then on the F, you start with your one again. To do so, slip your thumb under your fingers to get to the F. Now that your on your 1, continue 1, 2, 3,, 4, 5 until you get to C5 with your 5. Then descend from C5 to F4 with 5, 4, 3, 2 , 1, and land on F. Now to get to E, use your 3 (middle finger), and let it go over your fingers to get to E4, and finish it of with 3, 2, 1 on the E4, D4, and C4.

Keep On 
Now all this looks like a lot of complicated nonsense to you, but with good practice, and a lot of it, it will be second nature to you. You just have to keep on, and do not let this stress you out. Before you know it, you will know these basics and learn everything else! If you're not feeling it, just know, even if it is not said enough, just knowing the basics means you pretty much know everything else. Just keep on practicing to reach your goal!

How To Prepare for a 5K


A 5k is a road race which is approximately 3.107 miles long. This type of race is built for endurance rather than speed, as it tests your physical physique as well as your mental physique. It is the shortest among most competitive road races, however it is still not easy to complete. It is widely used in most high school competitive races and charity-awareness races around the world.  Many may say that endurance training for 5Ks is useless; however, one can not simply hop up and complete a 5K if they are not prepared mentally or physically.


What is Mental Strength?


Mental strength is about 20% of completing any 5K, marathon, or basically anything that is a challenge to the human body. If your mind is not prepared, you are not prepared. During the training process and the actual race, you have to have a tenacious mentality giving yourself that boost so you can complete each goal and cross the finish line.


Developing Mental Strength

Mental training always come before endurance, physical training. It starts with your determination, your dedication, and your discipline. How will you train if you procrastinate? How will you get better if you let your mind convince you that you are at your limit? The following steps are key to developing the mental strength you want to maintain


  • Be prepared for setbacks, you are not an Olympian so do not get discouraged
  • Connect your goal to a purpose that will motivate you
  •  Be strong! Your mind will tell you to stop and give in but you must fight it
  • You are your greatest opponent, defeat yourself and there is no limit


Lines to Remember


  •  “I can’t give up, I won’t give up, I don’t know how to give up”
  •  “I trained so I could run, I run so I could win”
  • “If my life depended on this race, act like it does”


Developing Endurance Strength


As a 5K is a long distance race, your must develop the endurance to do so. Endurance requires a significant amount of stamina, efficient breathing patterns, and a steady pace.


Stamina

Stamina is the physical or mental strength to do something for a long period of time which may be difficult to complete. Increasing your stamina reduces that rate or exhaustion and also the rate fatigue throughout the race. It allows the ability to endure the stress and discomfort that will factor within the 5k. In reality there is only ONE step to increasing stamina which is to EXERCISE. Start with brisk walk or a light jog (a pace you are comfortable with and gradually move up from there).


Efficient Breathing Patterns

The air where you breathe only persists for a relatively short period of time in the lungs, therefore preventing a complete exchange of air. This reduces the intake of oxygen. Poor breathing technique is commonly the reason that during running people feel the "devil" side stitch.
Deep belly breathing is efficient when running as it utilizes the lung's full capacity and strength.The air you breathe in also travels down to the lower portion of your lungs and stays there longer. This increases your oxygen uptake.


How To Practice This Method

  1. Lie down on a floor or on a flat surface then place your hands/palms on your stomach.
  2. Breathe in and out, notice your palm rise as you inhale and exhale
  3.  Focus on trying to exhale all the air out of your lungs. With a little practice, belly breathing will become automatic and feel completely natural.


Steady Pace

Your 5 K pace aim is directly related to your oxygen limit. Your oxygen limit is the point at which you begin to rely on air respiration. As you move past your limit, your body's energy, carbohydrates, is rapidly dwindling in your lungs. So, making the mistake of running 10-15 seconds faster than the pace of your goal marathon can make you bonk out during training or a race.


Different Pacing

Pacing is the equality of running as their slow, medium, and fast pacing. Do not be discouraged as others may have a faster pace than you, stick to your lane so that you can improve within time and frequency rather than intensity. Little by little, push yourself a little faster and faster so that you reach your ideal goal of a 5k time.


Proper Wear

Although there is no such thing as "right" wear, there is definitely clothing which facilitates the process of running. While running, you want your skin to remain cool with the sweat that you perspire. Without the athletic apparel, you risk the chances of allowing your body to lose water which may cause extreme fatigue or possibly heat cramps if the weather is extreme. Without your feet can not run, therefore you would want to provide your feet the best support possible as they will relieve the most strain.


  • proper running shoes (Nike Runner, Asics Nimbus, New Balance 1400v6)
  • breathable shirt, shorts (Nike Dri-Fit)
  • light-colored clothing


Day of  Training


  1. Prepare yourself mentally, focus on one goal
  2. Loosen up, hydrate stretch lower legs (lunges, calf stretches) to get blood flowing
  3. Start with your pace, don't exhaust your oxygen tank
  4. Keep steady pace throughout
  5. Record time to track improvement 
  6. When finish, walk for 5 minutes to restore your body to regular state


Run for Joy!

5K's can be competitive or simply for fun, but for complete enjoyment make sure you practice the correct techniques as it will test your physical fitness and mental strength.. I, from time to time, go on an occasional runs o keep in shape and enjoy the natural beauty of nature, in order to escape from reality. Your purpose may be to lose weight, train for bigger marathons, or even test your limits, the main objective is to do it right so you can do it again. Keep your mind the target and run like you stole something.


Sunday, October 20, 2019

How to Maintain a Sew-in and Braids

How to Maintain a Sew-in and Braids


Do you not know how to maintain your protective style? A protective style is any type of style that safely tucks your real hair away. For example, a sew-in, braids, and/or a wig would be considered a protective style. Do your sew-ins last only two weeks or your plaits only last a month? Continue reading this article to let your sew-ins or plaits last longer and still look fresh, while your hair is growing.


What is a sew-in?

A sew-in is where your permed or natural hair is braided down while you have extensions, also known as tracks or bundles, sewn onto the braided hair. Sew-ins are often used by black women. Most women get them because there is little to no damage and it protects the real hair while your real hair is still growing. There are several different types of sew-ins, but the most common sew-ins are closure sew-ins or a full sew-in with leave out. Leave out is common for women with permed hair since their hair is already relaxed. Closure sew-ins are used for women with natural hair because it protects all the hair and there will not be any heat to their real, natural hair.


What are braids?

Braids are a pattern formed by taking three or more strands of hair and braiding them together. There are several different types of braids. The most common types of braids are plaits, lemonade braids, tribal braids, and feed-in braids. Plaits are often called box braids because you part the hair in boxes all around the head. Lemonade braids and feed-in braids are basically the same things, but lemonade braids are braided to either the left or right side. Feed-in braids are braids that can go any direction, but you must keep adding braiding as you braid. Tribal braids just started becoming popular because it’s a combination of plaits and regular braids put in one hairstyle.


How to prepare your real hair for a protective style?

Here are 4 quick and easy steps to help prepare your hair before getting a protective style:

Wash and condition your hair- Cleaning your hair will help your hair grow while having a protective style

Moisturize your hair- Having dry hair will break off your hair and it will potentially stop growing.

Stretch your hair- Stretching your hair will be easier to manage and it will be quicker, and it will put less stress on your hair which will reduce breakage

Trim your ends- Clipping your ends will help hair growth and it is healthier for your hair

Maintaining a Sew-in

When getting a sew-in, you must get the type of sew-in that you think you can take care of and will last longer for you. When getting a traditional sew-in, (with leave out) you must always tie your hair up at night. No matter if it is just putting a bonnet on or wrapping your hair. Wrapping your hair will be more beneficial in the long run because just putting a bonnet on will still be rough on your leave out. When getting a closure sew-in, you still must tie your hair up, but you don’t necessarily have to wrap your hair up. You can tie a headscarf on your head and braid the remaining hair that is out. Braiding the hair will keep the hair soft and it can come out wavy in the morning when you take the braids out. You can also twist your hair up at night.


Washing your sew-in. When washing your hair with a sew-in, you need to use a spray bottle and spray between your braids. Most people (if they know how to maintain their sew-in) keep their sew-ins in for months and it is not good to not wash your hair for over 2 months. Use your fingers to massage your scalp in between the braids, rinse out the shampoo, then repeat two more times. When you are done washing your hair, sit in a hooded dryer to dry your braids and your extensions. Keep oil in your braids so your hair will stay strong and healthy.


Maintaining Braids

All types of braids can be maintained the same. When washing braids, you can do your normal washing routine because braids are basically your hair. The drying part with braids is the difficult part because it takes longer since there is braiding hair with your real hair. Always moisturize your hair with oils because having dry hair will lead to breakage and then your hair will be falling out. When oiling your hair, you can use any type of oil but do not do it every day. Every other day is fine but using oil every day can damage your hair. Do not leave your braids in for too long. You can get your edges redone when your hair starts to develop new growth so they can last longer but do not have braids in for over 2 months.

How to Hunt Deer if you never have Hunted Before

Are you wanting to hunt deer, but have never hunted before? By the end of this article, you will be armed with the knowledge to hunt deer...